Don’t Panic! A Step |
您所在的位置:网站首页 › show word temp › Don’t Panic! A Step |
Don’t Panic! A Step
|
We may earn commissions when you buy from links on our site. Why you can trust us. by Hemant Saxena on December 11, 2023 Have you ever lost a Word document due to an unexpected PC crash? Just this week, I experienced this firsthand. Hours of work vanished when my document disappeared. I didn’t panic, though, because my years of using Word taught me that Word would have a copy – even though I hadn’t saved it. Most of the time, Microsoft saves a copy in its unsaved documents folder. However, if you can't find your file, there are two additional places to look. I will walk you through three ways to find your unsaved document and provide tips on setting up AutoSave, so you'll never lose a Word doc again.
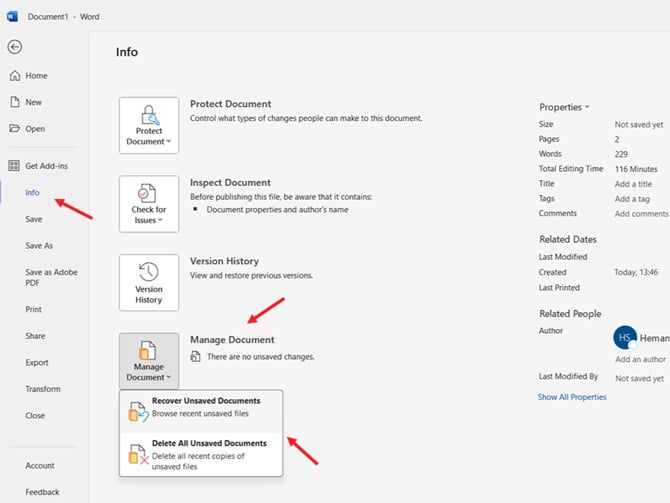
If Word or your computer crashes, you should be presented with the option to recover your document the next time you open Word. However, if that doesn't happen, you can easily find your recovered document by following these steps. In Word, select ‘File’ from the top menu bar. Select ‘Info’ on the left side panel. Click on the ‘Manage document’ Button. Select the ‘Recover Unsaved Documents’ option. In the pop-up window, you will see a list of your unsaved documents. If you find your unsaved document listed, select it and hit the ‘Open’ button to open the file.
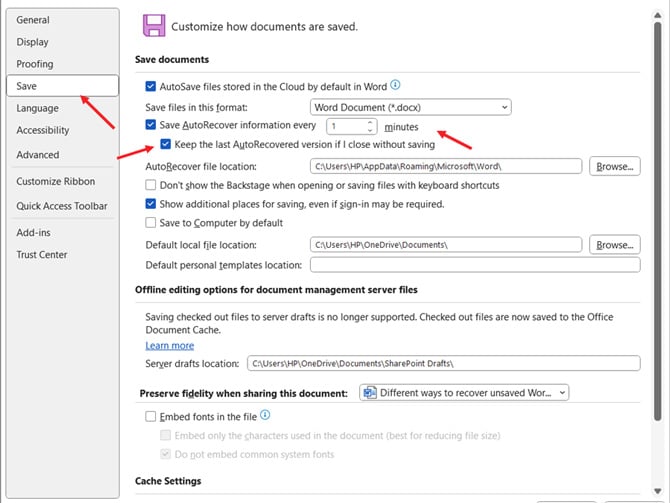
When you open your recovered file, a message at the top will remind you that it's a recovered document. You'll then be prompted to save it. Method 2: Manually search for your unsaved fileIf you don’t find your file using the steps above, try searching for it manually. On a Windows PC: Open File Explorer (Windows + E). Clear the URL bar by clicking on it. Type or copy-and-paste this URL into the URL bar: C:\Users\[YourUserName]\AppData\Local\Microsoft\Office\UnsavedFiles In the ‘Unsaved Files’ folder, see if your file name is visible. Generally, it is followed by a long string of random characters. Double-click the file to open it in Word and recover it. On a Mac: Open Finder. Go to Home icon in the left column Navigate to this folder: Library/Containers/com.microsoft.Word/Data/Library/Preferences/AutoRecovery. Any documents saved by the ‘AutoRecover’ feature will be visible at this location.Read more: How to Unsend an Email in Gmail: A Guide to Rescuing Your Sent Emails Method 3: Find a backup copy of your fileIn addition to recovery files, Microsoft Word makes backup copies of the files you’re working on every 10 minutes. Here’s how to find your backup file. In Word, select ‘File’ from the top menu bar. Select ‘Open.’ Choose ‘Browse’ and open the location where you saved a previous version of the document. Search for a file with the name "Backup of" followed by the name of the missing file, or try searching for files with the extension ‘*.wbk.’ Open the file you want to recover and save it.While the default is for Word to save every 10 minutes, you can set it to save as often as every minute. If you want to keep your files on your computer (instead of in the cloud), I recommend setting it to two minutes to minimize loss. (Scroll down for an online option to automatically save your work in real-time.) In Word, select ‘File’ from the top menu bar. Choose ‘Options.’ In the pop-up window, choose the ‘Save’ tab. Check the box next to the ‘Save AutoRecover information every’ menu and change it to one minute. Check the box next to ‘Keep the last AutoRecovered version if I close without saving.’
If you like the security of knowing you'll always have the most current version of your Word documents, you should use "AutoSave." With AutoSave, all changes are saved in real-time to OneDrive, so even if your computer crashes, you'll still have access to your written work as it existed at the time of the crash. Just choose OneDrive as the save location when you create or save a copy of a file, and AutoSave immediately activates. [Image credit: Screenshots via Techlicious, laptop mockup via Canva] As a lifelong tech enthusiast, Hemant Saxena is always looking for the latest gadgets that intersect with his hobbies. For more than a decade, he has been writing about consumer gadgets, popular apps, and social media tips for publications, including Windows Club and Techmate Tricks. TopicsTips & How-Tos, Computers and Software, Software & Games, Productivity Discussion
From K.G. on February 01, 2024 :: 3:07 pm Thankyou! I managed to rescue my unsaved document. Reply 
From Kristy on March 30, 2024 :: 9:30 pm You just saved my life. Massive thank you; Retrieved and recovered (I’m not recovered but my essay is). Thanks again; Reply 
From Josh Kirschner on March 31, 2024 :: 12:58 pm Glad our story was helpful. Thank you for the feedback! Reply 
From Ashley on April 09, 2024 :: 11:46 am I already had my Word program set to auto save every minute, but my document was still gone after my computer crashed. I tried all the tips here and nothing came up. I had been working on the document for days, so there should have been ample saved copies to recover, but it’s just gone. Reply 
From farhani islem on May 06, 2024 :: 4:31 am Same bro!! didn’t find any solution to recover my file!! Reply 
From Lisa on June 11, 2024 :: 5:38 pm when I go to Word and click file there is no option to select “info”. Reply 
From Karma on June 17, 2024 :: 2:51 pm youre an actual saint for making this Reply Leave a Comment Here |

【本文地址】